Field Menu
The field menu allows you customise specific fields in your record types in Calm and create your own fields. All the fields available for each record type in the database you have opened in the Admin program are shown under the field menu options, not just those fields that appear in your record type at the present time. The following options are available from the field drop down menu in Admin.
Before using the options under the field menu ensure that the database you wish to customise or create fields for is the one you currently have open in Admin. You may open the correct database using the Open option from the File drop down menu in Admin.
Define Types
This option allows you to create your own fields.
Axiell strongly advise you to use this option with care, as there are routines in Calm that use specific fields, for example for reports, OAI or data extraction. Please also bear in mind, if you export your data, other Calm users will not have the fields you have created. Before creating new fields it is advisable to check the list of fields already available.
To create a new field:
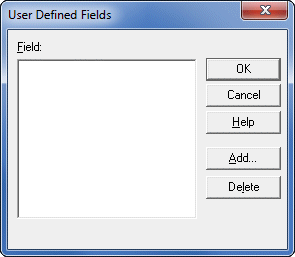
- Select Define Types from the Field drop down menu, the following dialogue box is shown:
- Click the Add... button
- Enter the name of your new field, choose its type (see the field type pages for details) and press OK.
Order/Group
The field order/group option allows you to change the order in which the fields are displayed on your Calm records. Changing the field order will affect all record types in the database you have open, as long as the field in question appears in that record type. Changing the field order will affect both new and existing records. To change the field order:
- Select Order/Group from the Field drop down menu, a list of fields is displayed. Please note that the fields are displayed in the order in which they would appear in your Calm records. The list consists of both used and unused fields for all the record types in the database you have open in the Admin program. Each group of fields is separated by a horizontal line.
- Scroll through the list of fields, highlight the field you wish to move
- Use the Move Up and Move Down buttons to alter the position of the field. Please note that the field will move one place for each click of the Move Up or Move Down buttons
Making a group
To make a number of related fields into a group you may block highlight
multiple fields by using the
SHIFT or CONTROL keys on your keyboard and
clicking with your mouse or holding down the
SHIFT key and extending the highlight using the
arrow keys on your keyboard. With a group of
fields highlighted, click the Make Group
button. The group will be enclosed by horizontal
lines.
When you are finished, click OK to set the Field Order
Widths
If you find that the width of the fields in your Calm records are inappropriate, either the field is too large or too small for the data you wish to enter, you may alter the field width using this option. This option controls the visible width of the fields, without affecting the data that is stored:
- Select the field that you wish to change the width for in the Fields list
- Use the Radio buttons to alter the field width, choose Full for a full screen width or one of the other buttons such as Half or Third for a fraction of a full screen width
- To set a specific field width in Pixels use the Fixed Width option and type the number of pixels required into the box available
- Click OK to set the new field widths
Hide/Show in OPAC
Calm incorporates a public view facility called OPAC which you may use to allow the general public to access the system and look at selected data, if required. There is also an customisable Internet/Intranet front end for Calm called DServe. If you are using either of these systems the Hide/Show in OPAC option allows you to define which fields are Visible and Hidden when members of the public view your records. Please note however that if you are using DServe it is also possible to set a DServe parameter which will define which fields are publicly available.
The Hide/Show in OPAC option consists of a column of Visible and a column of Hidden fields. To change the lists of visible and hidden fields:
- Highlight the field you wish to move in the Visible or Hidden column
- Use the Show and Hide buttons to move the fields between the two columns as appropriate
- Click OK to confirm the new settings
Comment
Field comments may be set as a guide to those filling in the fields in Calm. They may contain examples or guidelines to help your staff complete the fields. Some comments have already been added, for example sometimes where the field in question has a specific rule from a set of professional standards associated with it, or if the field is a System field (a field required by Calm). You may customise existing comments, remove them or add new comments to fields which do not have them.
To add, remove or change a field comment:
- Highlight the field you wish to work with in the field list, any comment that exists will be shown in the Comment window, if there is no comment then the Comment window will be blank
- Place your cursor in the comment window and type as normal to add, delete or edit the comment. Please note that to create a new paragraph using a "Carriage Return" you must hold down the CONTROL key on your keyboard and press the RETURN key. Pressing the RETURN key alone will close the Comment dialogue box and save any changes you have made.
- Click OK to save your changes
When using Calm, field comments will "pop up" if you hold your mouse over the field in question. You can stop comments from popping up by deselecting Show Field Tips under Options on the View drop down menu in Calm. A static view of the comment may also be displayed by placing your cursor in the field in question and selecting View Comment from the Field drop down menu.
Default Content
The Default Content facility is used to place the same content automatically into a field every time a new record is created in which the field in question appears. It is most frequently used in the Repository field, you may set the Default Content of this field to the name of your organisation to save you from having to type it each time you create a new record. You may find that some fields have been set with a sample default content when you first use Calm. To set or change default content:
- Select the field you wish to work with in the Fields column
- Enter the Default Content you require in the Default column
- Click OK to set your default content
When you next create a new record that includes this field, the default content you have set will automatically be displayed. This will affect all new records you create, but will not replace the content of this field in existing records.
Font
The Font option in the Admin program allows you to change and customise the font for individual fields in your record types. This will affect the content you type into the field, rather than the field label. You may make use of this facility in order to highlight certain important fields in your Calm records by altering the size and colour of the font to make them stand out.
To customise the font of a field:
- Select the field you wish to work with in the Fields column, the name of the current font is shown in the Font section
- You may use the Capitalization section to enforce Capitals, Lower Case or Initial Capitals on the text in the selected field if required. Please note that leaving the Capitalization option as Normal will allow you to type capitals and lower case as normal into the selected field.
- Click the Font button, the Font dialogue box is displayed
- Use the Font column to select a new font for the field if required
- Use the Font Style and Font Size options to customise the appearance of your text. Once you have selected a Font, a Style and a Size you will see a sample of your new font in the Sample box
- Select the Strikeout option to display text with a line through it or the Underscore option to displayed the text with a line under it
- Use the Colour dropdown list to alter the colour of your font
- Click OK to set the Options and close the Font box
- Click OK to confirm the options and close the Field Font dialogue box
The changes you make to the font will affect all new and existing records. If you wish to change the font for all the fields in Calm, or for the field labels, see the View Options.
Label
The label is the name of the field that is displayed on the record screen in
Calm, it is also used when searching on fields in Calm and for all fields in
DServe. It is possible to change
the label for any field in Calm, however this feature is most often used to
change the labels of UserDefinable fields which have
been added into the Calm record types. Although
changing a field label will change the label you
see in Calm and DServe, the Admin program will always use the
"real" field name, therefore it is very
important to make a note of any changes you make
to field labels. "Real" field names are also
used when customising reports.
To change the
label of a field:
- Select the field you wish to work with in the Fields column
- Type a new label for the field in the Label section. Please note that you must not use punctuation in field labels in Calm. If you use spaces in field labels, they will automatically be replaced by underscores. Spaces OR underscores will display in labels on record screens and the query by form search dialogue box in Calm and in all field labels in DServe, depending on the option you have set in View Options.
- Click OK to save the changes
Once you have re-labelled a field, the original name will appear in brackets after the new field label in the status bar in Calm i.e. Label(fieldname) when you have the cursor in the field.
Picklist
Picklists are lists of valid contents for particular fields in a Calm database. They enable you to improve consistency and make searching more efficient by encouraging and enforcing the use of valid terms only in fields for which picklists have been set. Picklists may be set to appear as "pop-up" or "drop-down" lists in Calm. Drop down picklist fields are displayed with a drop down arrow which is clicked to display the picklist, whereas pop-up picklist fields must be typed into or double clicked in to display the picklist. It is impossible to type into a drop down picklist field, whereas pop up picklists allow users to type into the picklist field.
For example the UserType field in the Users database might have valid entries of Staff, Guest, or Temp. These can be added to a picklist. If you type any other word in the UserType field (or misspell one of the permitted names), the following warning message will appear:
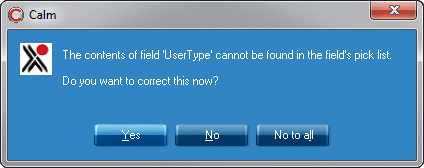
- If you click Yes, you are returned to the record and you can correct the invalid field.
- If you click No, the record is stored with the invalid field entry. You will be warned about this entry each time you edit this record, unless you add it to the Picklist. If you click No to all, Calm will save the record without validating it further.
Please Note: This checking will only take place if you have set Picklist in the Validation options.
Picklists may be added, removed or edited using the Admin program.
To edit a picklist in Admin:
- Select the field you wish to work with in the Fields column, the picklist for the field is displayed in the Picklist column
- To edit the picklist place your cursor in the Picklist column and edit, type or delete the picklist entries as required. You must type one picklist entry per line. Please note that to create a new line using a "Carriage Return" you must hold down the CONTROL key on your keyboard and press the RETURN key. Pressing the RETURN key alone will close the Picklist dialogue box and save any changes you have made.
- Select the Pop-up or Drop-Down radio button to have the picklist display as either a pop-up or drop down list
- Click OK to save the changes
To add a new picklist to a field that does not already have one:
- Click the Add button in the Picklist dialogue box, the Choose field dialogue box is displayed
- Select the field you wish to add a picklist to and click OK
- You will be returned to the picklist dialogue box, the field you selected has now been added to the list of Picklist fields
- With the field you wish to add the picklist to highlighted in the field column, place your cursor in the picklist column
- Type one picklist entry per line. Please note that to create a new line using a "Carriage Return" you must hold down the CONTROL key on your keyboard and press the RETURN key. Pressing the RETURN key alone will close the Picklist dialogue box and save any changes you have made.
- Select the Pop-up or Drop-Down radio button to have the picklist display as either a pop-up or drop down list
- Click OK to save the changes
To stop a field from having a picklist and make it into a "free text" field:
- Select the field you wish to work with in the Fields column, the picklist for the field is displayed in the Picklist column
- Click the Delete button in the Picklist dialogue box
- Calm will display a message asking you if you are sure you want to stop the field from having a picklist, to delete the picklist, click Yes, the field will be removed from the list of Picklist fields.
Please note that this does not delete the field from your Calm records, but simply stops the field from being a picklist field.
![]() Here is a
recorded demonstration showing how to add an
entry to a picklist using the Admin program. Please
note that the demonstration will open in a new window.
Here is a
recorded demonstration showing how to add an
entry to a picklist using the Admin program. Please
note that the demonstration will open in a new window.
For reference, the steps shown in the demonstration are detailed below:
- Run the Admin program
- First, open the database that contains the field you wish to change the picklist for. Click on the File drop-down menu, then Open. Click on the database in the list shown, then click OK.
- The Picklist option is found on the Field drop-down menu. Click Field, then Pick List...
- A dialogue box appears.
- In the left hand box highlight the field which you wish to amend the picklist for, by clicking on it.
- In the right hand box, enter or change the data (of the picklist).
Note: When editing the picklist you will need to press CTRL+ENTER to add new lines, not just ENTER on its own which quits the section. - To finish, press OK.
More information on using Picklist fields is found in the Fields section of this guide.
Serial Number
A Serial Number field is a field with an incremental, unique content which is assigned to the field by Calm. Serial numbers are either added automatically by Calm when a new record is created, as in the NameCode field in the Names database, or inserted by users where required as with the AccNo field in Archive Accession records.
You can assign a prefix, rolling serial number and suffix to any field which has been predefined as a Serial Number field. It is not possible to make a field into a Serial Number field if is is not one already. Only existing serial number fields will be shown in the list of fields in the Serial Number dialogue box.
To edit a serial number field:
- Select the field you wish to work with in the Field column; the Prefix, Next Number and Suffix for the field is displayed in the Picklist column. Please note that in some cases there may be no prefix or suffix set.
- You may type into the Prefix, Suffix and Next Number sections to alter the Serial Number. Please note that Serial Numbers must be unique. You must avoid setting a Serial Number which will duplicate those of existing records.
- Click OK to set the serial number
Whenever a new record is created in which the field is present Calm will assign the next number you have set here and increment it by one. Please Note that some Serial Number fields, such as AccNo in Archive Accession records and EntryNumber in Museum Entry Records, are not automatically completed by Calm. In these fields you may insert the number by placing your cursor in the field in question and clicking the INSERT key on your keyboard; however you may also type a unique entry manually into these fields.
Please Note: The only way to change which number is assigned to the next new record is to alter the serial number system from this option on the Field drop down menu in the Admin program.
More information on Serial Number fields and other Numerical Fields is found in the Fields section of this guide.
Vocabulary
Vocabulary lists are similar to picklists and are added, edited and removed in the same way. However when a Vocabulary field is used in Calm, you may choose to enter more than one item from the Vocabulary list into a single field, unlike a picklist field into which you may enter only one item from the picklist.
For example, you may wish to set a Vocabulary list for the field Materials in the Catalogue database if items in your collection are likely to be made of more than one material. A Vocabulary list for the Materials field might contain the words: Wood, Leather, Vellum, Glass, Parchment and Paper. If you catalogue an item made of leather and parchment, you would be able to choose both items to complete the field, not just one.
More information on using Vocabulary fields is found in the Fields section of this guide.
Authority
An Authority field in Calm is a field which, when you type into it, has a "pop-up" list which is displayed to prompt you with possible entries for the field in question. Usually this Authority list is taken from previous entries in the field in question itself, however another field may also be used as the source for the Authority list.
Several fields are defined as Authority fields by default, however you may make an existing Authority field into a free text field, change the field from which an Authority is taken, or make a free text field into an Authority field using this option in the Admin program.
To change an Authority field into a free text field:
- Select the field you wish to work with in the Authority column, in the Authority Fields dialogue box
- Click the button with the right-facing chevrons to move the field from the Authority Column into the Free Text column
- Click OK, the field will no longer be displayed as an Authority field in Calm.
To make a Free Text field into an Authority Field:
- Select the field you wish to work with in the Free Text column, in the Authority Fields dialogue box
- Click the button with the left-facing chevrons to move the field from the Free text Column into the Authority column
- Click on the drop down arrow at the Authority From Field section, select the field from which you want your new Authority field to take its "pop-up" Authority list. Please note that this will usually be from the field itself as with the Language field in the Catalogue database, but you may select a different field, as with the Artist field in the Catalogue database.
- Click OK, the field will now be displayed as an Authority field in Calm.
To change the field an Authority field takes its Authority from:
- Select the field you wish to work with in the Authority column, in the Authority Fields dialogue box
- Click on the drop down arrow at the Authority From Field section, select the field from which you want your Authority field to take its "pop-up" Authority list. Please note that this will usually be from the field itself as with the Language field in the Catalogue database, but you may select a different field, as with the Artist field in the Catalogue database.
- Click OK
More information on using Authority fields is found in the Fields section of this guide.
Synonyms
The Synonyms facility in the Admin program relates to searching on fields in Calm. It allows you to tell Calm to search additional fields when a user elects to search on one specific field. For example, you may use the RefNo or ObjectNumber field in the Catalogue database for your unique reference numbers, however your collection may also have some old reference numbers which you have recorded in the field called AltRefNo (Alternative Reference Number). While searching you may wish Calm to search in AltRefNo as well as in RefNo or ObjectNumber for the number searched for, to ensure that any possible occurrence of the number is found. To set up Field Synonyms for Searching:
- Select the field you wish to search on in the first "Field" column, for example RefNo
- Select the additional field you may wish to search on in the third "Fields" column, for example AltRefNo
- Click the button with the left facing chevrons to move the field from the last column into the middle, "Also Search", column
- Click OK
In the example above, the next time you search for a number in the RefNo field, Calm will also search the AltRefNo field for the same content. These settings will remain for all searches until you change them again.
Properties
The options in the Field Properties section of the Admin program allow you to alter or add certain attributes to fields in the Calm databases using the Field Properties dialogue box, as shown below:

Please note: System fields, required by Calm, cannot have certain of their attributes altered, in these cases the options will be disabled.
Mandatory Fields
It is possible to set certain fields as being mandatory in Calm. This means that the next time you create a new record in which the mandatory field is present, Calm will display an error message if you try to save, or move away from, the record without completing the field in question, providing that the field validation options have been set accordingly. To make a field mandatory:
- Select the field you wish to work with in the first Field column
- Click the Mandatory Attribute box to place a "tick" in it
- Click OK
Please Note: Certain fields in Calm are given the 'Mandatory' attribute by default as this is required by the application. You must NOT remove the 'Mandatory' attribute on the following fields: AccNo field and EntryNumber field in the Accession/Object Entry database, LocationReference in the Locations database, Id field in the Resources database and any fields in the Security database.
By default most fields are given the ‘indexed’ attribute. For large volumes of data you may wish to remove the attribute for certain fields, meaning the contents cannot be searched for. This will save time on searches and for re-indexing.
If a field has a ‘Pickable’ attribute it will be displayed in the list on the ‘Choose Field’ dialogue box. Examples of where this dialogue box appears are: the Insert or Append options from the Field drop-down menu and when you right-click on an Overview column to add another column. A field with a ‘Pickable’ attribute will also appear in the list of fields to sort on in the Sort Hit List dialogue box. Some users find these lists too long and prefer to only show particular fields relevant to them, this can be achieved by removing the ‘Pickable’ attribute.
Fields with an 'Admin' attribute can only be seen by an Administrator. This means someone who has Administrator rights set in the Admin program security. This feature may be used as a type of selected filtering of records. Fields with this attribute set will not be shown on a record screen, or in any lists of fields to choose from, for example, when inserting fields into a record, unless the logged in user is an Administrator.
Unique
Making a field 'unique' means that it must contain data that is not duplicated in the same field in another record in the database. Calm will produce an error message if you try to save a record containing a unique field in which the data is not unique (if the validation options are set in Record drop down menu). You may not insert more than one version of a unique field into a record.
Choosing this option for a field means that when a new record is created, the field will automatically be completed with the next available serial number (determined by the Serial Number option, as described above).
Bib1 and MARC tags
Bib1 and MARC tags can be associated with fields in Calm and used for searching Calm with the Z39.50 protocol. Some MARC and Bib 1 tags have been associated with Calm fields by default. It is possible to change these attributes or to add tags to fields which do not yet have them. To give a field a Bib1 or MARC tag attribute:
- Select the field you wish to work with in the first Field column
- Type the MARC or Bib 1 attribute into the appropriate box in the Field Properties dialogue box
- Click OK