Security Settings
The following is an explanation of the Security settings that can be made here in the Admin utility, to protect the data being held in Calm.
Summary: Click Security on the File drop down menu to assign permissions for your users which allow them different levels of access to the Calm databases.
Please note: It is important to use the Security option in an informed way, as selecting certain combinations of settings may prevent you from accessing Calm.Under the security system each Calm user belongs to one group. Each group has defined security attributes and roles for every database in Calm.
- On the File drop down menu, click Security. If this is the first time Security has been opened in your organisation's
copy of Calm, you will be asked if you want to provide security for the application. This is how Calm learns who will initially be allowed
to edit security. After this, you must explicitly give users permission to edit security. Click Yes. You will see the following dialogue box:
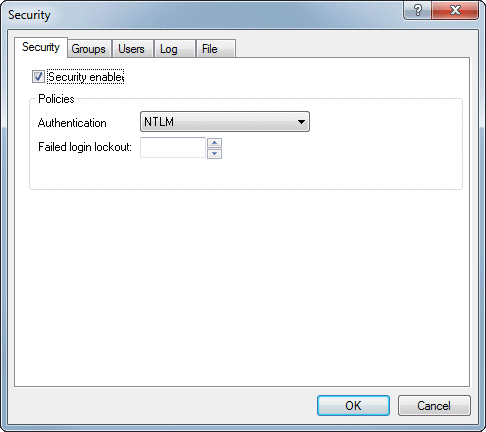
Security Tab
Security enabled - Ticking this box activates security. When this box is ticked, access to Calm will be determined by the groups and roles settings made within this security dialogue box. If security is not enabled, administrator-only functions such as deleting a hitlist of records or running scripts will NOT be available in Calm (this is because without security enabled, all roles are automatically enabled including the 'Non-Administrator' role). It is possible to disable security (by removing the tick in this box) but save all existing settings ready to enable security at a later stage. This means that security can be configured without making it active.The following two options are global policy settings which apply in Calm.
Authentication - is the authentication method. If you are unsure which authentication method to use, please consult your I.T. department. Take care with this setting as it is possible to disable your own access to the Security option. The authentication methods available in the drop-down list are described below:
-
Authentication disabled
To disable authentication, choose the blank line in the drop-down list. If this option is set, only Application users are allowed to access Calm, network traffic will not be encrypted and all data (including passwords) will be sent over the network as plain text.
This setting is suitable for network environments where the other methods of authentication cause problems, or for those where security isn't required, so the overhead of the authentication process and encrypting network traffic can be avoided.
This option is not available if the current administrator is a Windows user (otherwise the administrator will not be able to log into the system).
- NTLM
NT Lan Manager. This is the default option and should work in most network environments. - Kerberos
This is more secure than NTLM, but also requires specific network setup by a domain administrator. A domain administrator must register a service principal name in Active directory. Please see the technical bulletin available from the Documents page. - Negotiate
Automatically chooses the best authentication method for your system.
Calm allows three attempts at login; after which, any value you enter here determines the wait time in minutes until the user is allowed to attempt to login again. The wait time doubles following each unsuccessful login. If this value is zero, or blank as it is by default, users can repeatedly attempt to login to Calm (in sets of three attempts).
You can also log failed login attempts, see the log tab description below.
Groups Tab
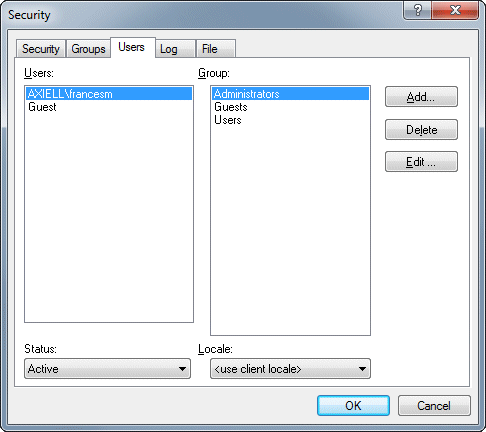
All users that are registered in the security system to use Calm must belong to a group. They can only belong to one group. This tab shows existing groups with their associated attributes and also gives options to add a new group, delete a group or set roles for a group. The Users tab (described below) is where Users are assigned to their group.
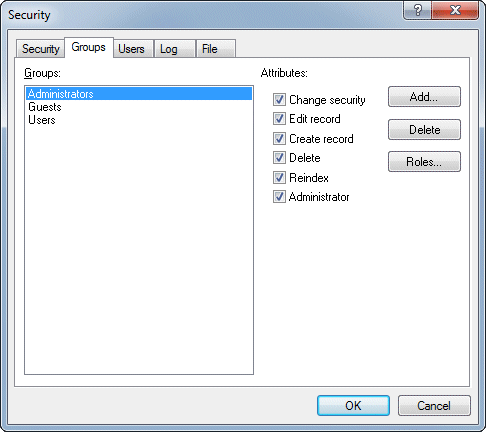
The Change security, Reindex and Administrator attributes are primarily used in Admin, the Edit record, Create record and Delete attributes are used within Calm. These are global settings, they can be further refined using the Roles option. Ticking an attribute means that all users in the highlighted group have permission to perform that particular action edit records, create records, delete records or reindex in all the various Calm databases. But first the system will check the Roles settings. For example, you may tick the Edit record attribute for a Conservators group, however in the Roles dialogue that can be further refined and the Conservators can be given permission to edit the Catalogue and Conservation databases. Whereas an Archivists group, might also have the Edit record attribute ticked, but in Roles, only have permission to edit the Catalogue database and not the Conservation one.
Please note: In order to delete records, you must also have the 'edit record' option ticked.
Removing a tick from an attribute means the particular function will not be available for that group of users and any settings in Roles for that function will be ignored. For example, if the 'Delete' option is unchecked here, users in this group will not be able to delete records in any of the databases in Calm, regardless of the settings in the Roles section.
Ticking the 'Administrator' attribute means that users in the highlighted group can add synonyms and define glossaries in Calm, as well as being able to access this Admin program, for example to edit a field picklist. If you also want users in the group to be able to update the security settings here in the Admin utility, you will need to tick the 'Change security' option. Add
Click this button to add a new group. Enter a name for the group, this will then be shown in the list of existing groups and you can determine the permissions for it by ticking the relevant attributes whilst the new group is highlighted.
Delete
With an existing group highlighted in the list, pressing this button will delete it. Please note: Users in this group will not be deleted, but because their group has been deleted, they will no longer belong to a group, so you will need to assign them to a new one.
Please note: The person currently logged in cannot delete their own group (the Delete button will be disabled), this adds protection and is designed to prevent customers accidentally removing their access to security completely.
Roles
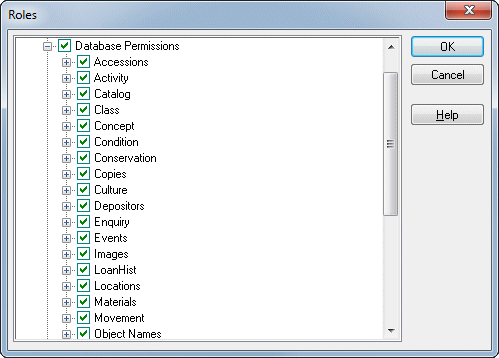
When you click the 'Roles' button, another dialogue box is displayed as shown below, allowing you to choose various roles for the members of this security group.
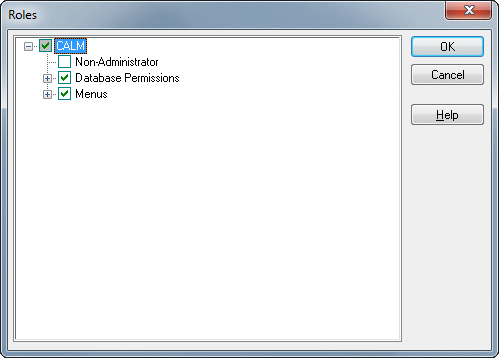
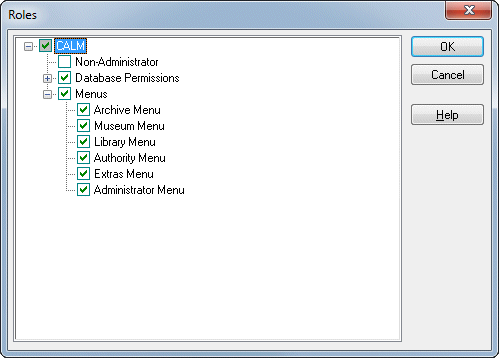
If you expand the 'Menus' branch, as shown below, you will see a list of the menus.
Above the 'Menus' option is the 'Database Permissions' option, this can also be expanded, as shown, to display a list of each database in Calm.
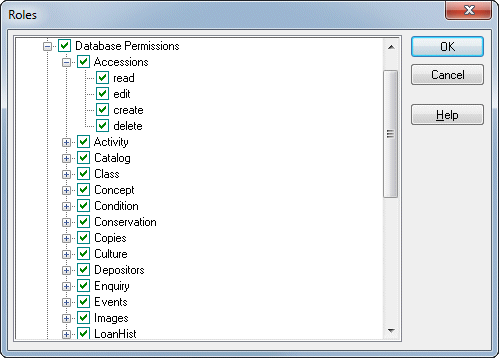
Read: The user can see records from this database at the bottom of records in other databases that are linked to them but cannot open this database from the main menu or from tabs at the tops of records.
Edit: The user can access this database from the main menu or from tabs at the tops of records and view or edit existing records. The user cannot see the 'New' or 'Delete' buttons.
Create: The user can view or edit existing records and also use the 'New' buttons on the main menu and in the database to create new records. The user cannot see the 'Delete' button.
Delete: The user can view, edit, or create records in this database and also use the 'Delete' button in the database to delete existing records.
Throughout the roles dialogue box, ticking the top of a branch (for example 'Database Permissions', a database name or 'Menus') will automatically tick all the options in the branch below it and removing the tick from the top of a branch will automatically remove the ticks from all the options below it.
Tick or remove ticks from these options to determine roles for all members of this security group.
Users Tab
The users tab is where you add new users and assign them to a group. You can also delete users or edit their details from this tab.
This indicates the status of the selected user; choose 'Active' or 'Disabled'. A 'Disabled' status will temporarily block a user from logging in to Calm. Examples where you could use the Disabled option include maternity or paternity leave or staff on secondment who will return.
Locale
Choose the locale that has suitable settings for this particular user. The 'use client locale' option will take date, currency and alphabet settings from the computer that the user is running Calm on. Alternatively, choose a language from the list to use its associated settings, rather than the computer settings.
Add
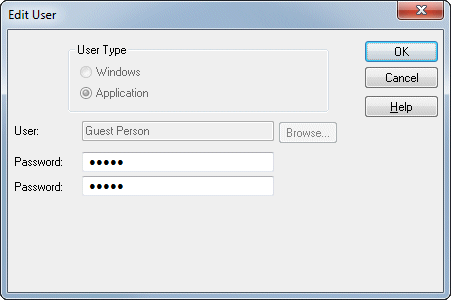
There are two types of users that can run Calm - Windows users and Application users. Once you have added a user, you cannot change their user type.

Alternatively, add an Application user. This requires a password which Calm will ask for when the user logs in.
Assigning a group - Once you press OK on the Add User dialogue, you will be returned to the Users tab and the new user's name will be shown in the list of existing users. New Application users will default to the 'Guest' group. With the new user's name highlighted, select the group to which they belong and click OK.
Delete
With an existing user highlighted in the list, pressing this button will delete them from security.
Please note: The person currently logged in cannot delete their own user name (the Delete button will be disabled), this adds protection and is designed to prevent customers accidentally removing their access to security completely.
Edit
Use this option to change passwords for application security. Overwrite the existing password with the new one in both password boxes.
- Highlight the user's name on the Users tab
- Select the group that you want them to belong to
- Click OK
Log Tab
The log tab allows you to create an event log which records the use of Calm. Currently the only event that can be logged are Logins and Failed logins. When you select the log tab, the dialogue box shown below appears:
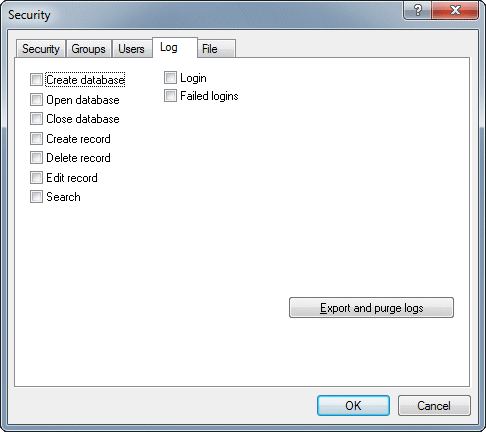
The event log is stored internally in Admin. To produce a log file which you can view, click the 'Export and purge logs' button. This will create a text file called security.log in the startup folder (usually dscribe\Archive) on your server. If you have previously created an event log file it will remain and any information logged since the 'Export and purge logs' button was last clicked will be appended to it.
File Tab
Security settings can be imported or exported by members of the Administrators group.
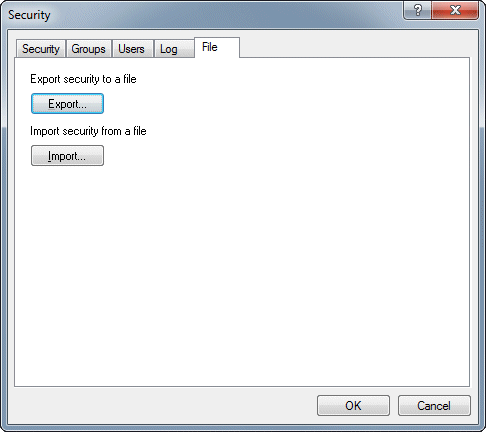
Use this option with care, as all security information will be exported to a file that can be read.
When you click this option, you will be asked to enter a file name and location in which the security settings can be stored. The file that is produced will be in XML format. This option can be used to create a back-up copy of your current security settings.
Import
Use this option to import security settings previously exported from Calm (including from previous versions).
When you click this option, you will be asked to browse for the location of the file you wish to import.