Case study: exporting for mail merge
This example explains how to export selected fields from a Calm record type to a Microsoft Word mail merge document. Please note: These instructions apply to Microsoft Word 2007, 2003 and XP/2002, any versions prior to these are no longer supported by Microsoft.
(Alternatively, to export ALL fields in a record use the comma or tab separated export method - no export format is required).
For further help with Word consult your Word user guide or contact Microsoft.
For this example the Calm record type is :User. It has the following fields:
UserName, Address, Tel, Fax, Note.
The Word document, in this case a letter, requires information from the following fields:
UserName, Address.
In Calm:
- Search for the relevant User records in Calm to create a hit list.
- Select Export from the File drop down menu.
- In the Export Records dialogue select Hit list (underneath "What").
- Select the Method as Formatted.
- Select the Character conversion as (None).
- Click on the File button, type in a name for the Export Format file (with the file extension .EXP), then click Open.
You will now see your filename (and folder) below the File and Edit buttons.
- Click on the Edit button.
- Select User from the list of
record types (normally when you first open the file the default record type is
shown and you would click the down arrow to see the list of other record types)
and write the export format as follows (the delimiters should be a symbol not
used in your data, most commonly used are | for field separator and # for record
separator):
{UserName}|{Address}#
- Select File, Exit and Return to DScribe from the menu to return to the Calm Export Records dialogue.
- Click the To File button and type in the name of the file to export to (with the file extension .TXT). For this example it will be ORDER.TXT, click on Save. This file will be the Word data file that is attached to the merge document.
- Click OK to export.
Hint: Each time an order letter is to be sent, create a new hit list of the appropriate records and export them (you can simply open the Export Format File, rather than creating it again). The data file, called ORDER.TXT in this example, can be overwritten each time you export.
Creating a Header:
A 'header' is required for the mail merge to work, otherwise Microsoft Word will treat the first record of your data as a header and it will only merge the second record onwards. You need to decide if you would like to create a header source file (which can be used again each time you run this mail merge) or you would prefer to edit the data file (ORDER.TXT in this example) to include titles (which would need to be done each time an export is performed and a new data file is created).
1. If you decide to create a header source file, first you need to add a button to your Microsoft Word Quick Access toolbar, as follows:
- Run Word.
- Click the Microsoft Office button.
- Click 'Word Options' at the bottom of the box.
- Choose 'Customize' from the list on the left.
- Select 'All Commands' in the 'Choose commands from' dropdown list.
- Select 'Mail Merge Create Header Source' in the left hand list and click Add
>> to move it to the right hand list.
- Click OK to close the dialogue box. This has added the 'Mail Merge Create
Header Source' button to your Quick Access toolbar (it appears as a green light
at the top of the screen).
2. If you decide to include titles in the data file, follow the steps below:
- Using Windows Explorer, browse for the file which contains your exported Calm data,
in this example ORDER.TXT, in
your Calm application folder (usually \dscribe\archive).
- Open the file using a text editor such as Notepad.
- With the cursor at the beginning of the data type the header, for this example, type
Name|Address#
Please note: Do not press ENTER here, as you do not need to add any new lines or line spaces.
- Save the file and close it.
The example here follows the correct format for a header; the number of field
names equal the number of exported data fields in the file, the header field
names are in the same order as the corresponding information in the exported
data and the same field delimiter is used for both the header and the exported
data.
The header does not have to use the field names from Calm, you can use any
names that you will recognise when you are inserting merge fields into your
Microsoft Word letter.
In Microsoft Word:
The next steps describe how to produce the order letter in this example using Microsoft Word 2007, if you are using an older version of Microsoft Office please see the section below.
- Open a new document file and type in the body of your letter.
- Click on the Mailings tab, choose 'Select Recipients', then 'Use Existing List...' from the dropdown list.
- Browse for your Calm application folder (usually \dscribe\archive).
- Find and click on your exported Calm data file - ORDER.TXT, then click 'Open'.
- The 'Header Record Delimiters' dialogue box will appear. Select | (pipe) in the Field delimiter
dropdown list and # in the Record delimiter dropdown list, then press
 .
.
- If you chose to create a separate header source file above, follow these
instructions:
- Click the green light at the top of the screen which has the tooltip 'Mail Merge Create Header Source'. The 'Create Header Source' dialogue will appear.
- With the 'Title' field highlighted, click 'Remove Field Name'.
- Repeat for all the fields, so the list is empty.
- The header does not have to use the field names from Calm, you can use any names that you will recognise when you are inserting merge fields into your Microsoft Word letter, for this example type 'Name' into the 'Field Name' box, then click 'Add Field Name >>' to move it to the 'Field names in header row:' list.
- Type 'Address' into the 'Field Name' box, then click 'Add Field Name >>' to also move it to the 'Field names in header row:' list.
- Press OK.
- Browse for your Calm application folder (usually \dscribe\archive).
- Enter ORDERHDR as the file name and ensure that the file type is 'Word Document (*.docx)'.
- Click 'Save'.
- Move the cursor to the area of the letter where the address is to be inserted.
- Click on 'Insert Merge Field' in the tool bar.
- Depending on previously run mail merges, the 'Insert Merge Field' dialogue
box may appear. In which case, ensure that 'Database Fields' are selected.
- Select the Address field (which is the name we typed into the header line of
the data file or supplied in the header source file) from the
list shown (and press 'Insert' followed by 'Close' if you are choosing the field from the list on
the dialogue box).
- A place holder for the Address field is inserted at the cursor - this
appears as the word 'Address' enclosed in chevrons. Move the cursor and insert the next merge field
in the same way; Name.
- The document can now be completed. Click on 'Finish & Merge' in the toolbar,
then choose 'Edit Individual Documents...' from the dropdown list.
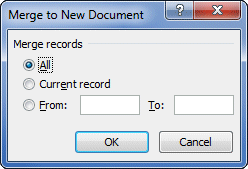
- The 'Merge to New Document' dialogue box will appear as shown. Choose 'All'.
- Press
to merge your Calm data into the template.
The merged document will now be produced.
Before you close Word, you can print the document or save it for future use.
In the future, if you wish to create another mail merge letter or document using the same header file, follow these instructions:
- Open a new document file and type the body of your letter.
- Add the 'Mail Merge Open Header Source' button to the Quick Access toolbar using the same method as adding the 'Mail Merge Create Header Source' button described above.
- Open the data file and choose the field and record delimiters as above.
- Click the green light at the top of the screen which has the tooltip 'Mail Merge Open Header Source'.
- Browse for your Calm application folder (usually \dscribe\archive).
- Find and click on your header file - ORDERHDR.DOCX, then click 'Open'.
- Insert the merge fields as described above.
- Complete the mail merge as above.
In older versions of Microsoft Word:
- Open a new document file and type in the body of your letter.
- From the menu select Tools, Mail Merge.
- Click the Create button, and choose the appropriate form - in this case Form Letters. In the resulting dialogue click the Active Window button.
- Click the Get Data button and select Header Options… Click Create… on the box titled Header Options.
- You need to remove all the existing fields in the header row, as they are not required for this example. To do this repeatedly press the Remove Field Name button until the box on the right is blank.
- Next, add the fields that we require for the header, in this example UserName and Address. To do this, type UserName into the Field name box in the left and press the Add Field Name button.
- Repeat the above step with Address. These 2 fields will now appear in the "Field names in header row" box on the right. Click OK.
- Give the header file a name, for this example it will be ORDERHDR.DOC Click Save.
- Click the Get Data button and select Open Data Source. Find ORDER.TXT (the file you exported your Calm data to), changing File Types and Folder if necessary, click on Open.
- The document now takes on the attributes of a mail merge document, an Edit Main Document button will appear, press this.
- Move the cursor to the area of the letter where the address is to be inserted. Click on Insert Merge Field button on the tool bar and select Address from the list of fields. The Address field is inserted at the cursor.
- Move the cursor and insert the next merge field, UserName.
- The document can now be completed. From the menu select Tools, Mail Merge.
The name of the data file appears under the Get Data button. - Click the Merge button, select Merge to: New Document and any other options required, click Merge.
The merged document will now be produced.
Before you close Word, you can print the document or save it for future use.