The Tree Menu
The tree view is used to display your collection in its hierarchical structure; however it may also be used as the basis for adding records to the Collection using the Tree Menu.
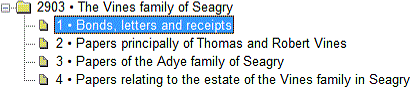
To add records to a collection using the tree menu you must first open the tree to see all the records in their hierarchical context. Below there is an example of a tree based on the RefNo field in an archive Catalogue collection:
Create Child
To create a child record (i.e. to add a record at the level below the current record):
- Highlight the record you wish to add a child record to by clicking on it in the tree. Make sure that the record is fully highlighted in a solid colour, not in grey.
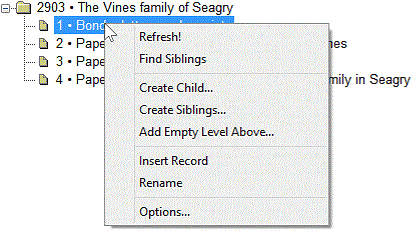
- Right click with the mouse on the record, the tree menu will appear as below.
- Select Create Child, the choose Record Type dialogue box will appear, select the record type you wish to use and click OK
- It is now important to remember to enter the new unique identifier after the level separator (“/” or “.”).
- Complete any mandatory fields on the new record
- Save and refresh by clicking
the
 button in the tool bar or by pressing F12 on your keyboard
then right-clicking in the tree view and choosing Refresh
button in the tool bar or by pressing F12 on your keyboard
then right-clicking in the tree view and choosing Refresh
The new record is created. The tree field (in the above example the RefNo field) of the new record will contain the same contents as that of the same field in the parent record. This will be followed by the level separator (“/” or “.”)
In the above example the data in the new RefNo field would be 2903/1/
NB: In the ObjectNumber field, the '.' would be used as a level separator.
Create Siblings
You can use this option to create one record or several different records, on the same level at the same time. It works in exactly the same way as Create Child above except that the RefNo that is copied across is at the same level as that of the original record.
- Right-click on a record in the tree that you wish to create sibling records for
- Click on Create Siblings
- You will be asked to enter the number of records you wish to create, enter the appropriate number and click OK; the new records will be created
The new records will have the tree field completed with references which continue in sequence from that of their sibling/s. For example, in a tree like the example above, if you highlight the RefNo 2903/4 and create 2 siblings, 2 new records will automatically be created with RefNos of 2903/5 and 2903/6.
You may now access each record individually to enter data into the other fields. Enter the details of the catalogue records in the usual way. Once you have saved the records and refreshed the tree you will see the new record/s at the same level.
Add Empty Level Above
The Add Empty Level Above facility allows you to create a new, empty level in a tree directly above an existing record. This level can potentially be below other records that already exist. Because it can renumber many records at once (every record at the same level as or below the record you start on) it is a powerful feature and should be used with caution. Please ensure that you mean to make changes before you carry them out.
If you wish to create a level in the tree above an existing record:
- Select the record in the tree that you wish to add an additional level above
- Right click on the record and click on Add Empty Level Above.
- The Add Empty Level Above dialogue box will appear. The text you enter here will be the number of the new level (e.g. if you added above PL/3/1 and entered 'AB', the new RefNo of PL/3/1 will be PL/3/AB/1).
Note: This does not create a record. It adds an empty level into the hierarchy and re-numbers the records below it. In the above example, it would be up to you to then create PL/3/AB.
In the archive catalogue database, you do not need to fill that empty level manually; there is an
 button that will fill the
empty level for you. To use it, you must be on a record immediately below the empty level (in the above example, PL/3/AB/1). Then:
button that will fill the
empty level for you. To use it, you must be on a record immediately below the empty level (in the above example, PL/3/AB/1). Then:
- Click the
 button on
the side button strip.
button on
the side button strip. - Click the
button on the side button strip.
A record will be filled in to the empty space in the hierarchy (in the example above, PL/3/AB) using some data from the record you had started on (in the example above, PL/3/AB/1).
Insert Record
The Insert Record option acts as a re-numbering function. When you right-click a record and click 'Insert Record', a record will be added to the database with the same identifying number as the record you right-clicked. Meanwhile, the record you right-clicked will have its identifying number go up by one, as will the record after it, the record after that one, and so on. It is useful if you have created a number of sibling records in a tree but then realise that you need to insert another sibling into the middle of the group and renumber all subsequent siblings.
If you wish to do this:
- Select the record which you wish to increment at in the tree
- Right click on the record in the tree, the tree menu will appear
- Choose Insert Record, you will see a warning message explaining what is about to happen; click OK to proceed
The reference in the tree field on this record and any records below it will be increased by one. In the example above, if you select 2903/2 and insert record, this record will be re-numbered to 2903/3, 2903/3 will become 2903/4 and 2903/4 will become 2903/5. Any children such as 2903/3/1 would also be renumbered, in this case to 2903/4/1.
You will be left on the new, inserted record (in the case above, 2903/2) which is ready to be filled out.
Renumber Children
If you have moved records from one part of the structure to another it is possible that reference numbers are now duplicated. To prevent this, click with the right mouse button on the new parent (the record above where you have moved the children to), to display the options and select Renumber Children. Calm will automatically renumber the moved records to remove any possible duplicates.
Rename
The Rename function allows you to change the contents of the tree field for a record in the tree; it automatically updates the record and any records below it. For example if you right clicked on an archive catalogue record in the tree and changed its RefNo from 2903 to 1200, the records 2903/1 to 2903/4 would automatically be renamed as 1200/1 to 1200/4.
Find Siblings
The Find Siblings option is always available when you are in any level of a tree. It displays a hit list of all sibling records of the highlighted record, so that you can scan through them one by one. To overview all the records select View, Overview from the menu bar.
Find Children
This option works in exactly the same way as Find siblings above but you must choose a record with levels beneath it for children to be displayed.
Expand Branch
If you are browsing through the tree structure and are at the top level of a branch it can be time consuming to manually open up every sub-branch. If you click on Expand Branch every level of that branch will open up.
Collapse Branch
This option is the opposite to expand branch i.e. it automatically closes every level of the branch below the record you are viewing.
Tree options
The last heading on the menu which appears when you click in the tree with the right mouse button is Options. The following dialogue box appears when you click on it :
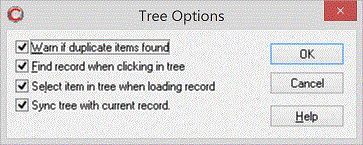
The Tree options work as follows:
Warn if Duplicate Items Found
If this option is checked you
will receive a warning if you open a tree in which there is more than one record
with the same content in its tree field.
Find Record When Clicking in Tree
If this option is checked when
you click on an item in the tree window, the corresponding record is
automatically displayed in the main database window.
Select Item in Tree When Loading Record
If this option is checked, when you view a record in the
main database window, that record will be selected in the tree.
Sync Tree With Current Record
If this option is checked, when you select a record in the
Overview, that record will be selected in the tree.
While all of these options make Calm run more sensibly, you may find that they slow your system down. If so, disabling one or more may lead to a performance boost.