Manipulating Hit lists/Overview facility
Using the Overview
The Overview can be used to view a hit list of records in any database in Calm. It
allows you to view the contents of one or more fields from each record in the
hit list. The overview will display a maximum of 19 fields. Clicking on a record in the overview will make it the current record on
your screen. The Overview can be used to browse, sort and refine your hit list.
To open the Overview click the View drop down menu and click Overview
or click on the Overview button
![]() on the tool bar. The Overview will remain
visible until you click View, Overview or the Overview button in the tool bar
again. As you move through the records in the hit list the current record will
be selected in the Overview.
on the tool bar. The Overview will remain
visible until you click View, Overview or the Overview button in the tool bar
again. As you move through the records in the hit list the current record will
be selected in the Overview.
Customising the Overview
The Overview is comprised of columns headed by Calm field labels. The fields which are displayed in the overview can be changed. To alter the overview, right click on one of the column headings in the overview. The Choose Field dialogue box will appear as below:
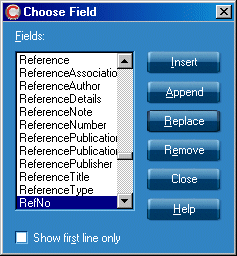
In the Choose Field dialogue box the fieldname you have right-clicked on will be highlighted. If you wish to work with a field other than the highlighted one it is important to remember to un-highlight it to deselect it before you proceed.
To delete a field from the Overview:
- Right click on the field in the overview you wish to remove, the field will
be automatically selected in the Choose Field dialogue box, click the
 button in the dialogue box to remove the selected field . Please note:
this will only remove the column in your overview, it will not delete any
data stored in this field.
button in the dialogue box to remove the selected field . Please note:
this will only remove the column in your overview, it will not delete any
data stored in this field.
To replace one field with another in the Overview:
- Right click on the field you wish to replace, this field will be selected automatically in the Choose Field dialogue box
- Deselect the field you wish to replace, select the field you wish to add and
click the
 button in the dialogue box
To insert a field into the Overview:
- Decide where in the Overview you want the new field to appear. Bear in mind that the field will be inserted to the left of whatever field you right-click on next
- Right click on the appropriate field in the Overview, the field you right-clicked on will be automatically highlighted in the Choose Field dialogue box
- Deselect the highlighted field and select the field you wish to insert
- Click the
 button in the dialogue box, the field will appear in
the overview to the left of the field you initially right-clicked on.
button in the dialogue box, the field will appear in
the overview to the left of the field you initially right-clicked on.
To append a field to the far right of the overview repeat the process to
insert a field but click the
 button instead of the
button in the Choose Field dialogue box
button instead of the
button in the Choose Field dialogue box
Merging fields in the Overview
It is possible to have more than one field in a column in the Overview. Where there is more than one field in a column, the contents of the first field will be displayed unless the first field is empty in which case the contents of the second field will be shown. This may be useful when you have records of different types combined in the Overview, for example if you are viewing both Object and Component Records you may wish to merge the RefNo and ObjectNumber fields in the Overview. To merge fields in the Overview:
- Right-click in the appropriate field in the Overview, note that the field you right-clicked on will be selected in the Choose Field dialogue box
- Make sure that all the fields you wish to insert as merged fields are highlighted, un-highlight any you do not wish to appear
- Click OK, the fields will appear merged in one column in the Overview
Column widths
When an overview is opened the column widths are determined by the widths of the fields displayed.
To increase or decrease the width of a column:
- Move your cursor to the column headings, point to the border between the column you wish to change and the following column.
You will notice that the cursor changes to a re-size one (an arrow pointing right and left).
- Click and drag the border of the column to the desired width.
Sorting the Hit List
You can perform a quick sort on one field at a time by clicking on a column heading in the overview. This will sort the hit list in order according to the contents of that field.
To sort a hit list by more than one field at a time, or to perform more complex sorting you can click on the Hit List drop down menu and click Sort. The Sort Hit List dialogue box appears, as below:
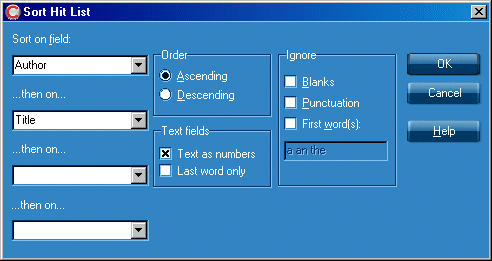
In the Sort on Field: section you can select the fields by which you wish to
sort the hit list, you can sort by up to four fields at once.
You can set the sort options as follows:
Order: Select Ascending or Descending to sort the records in alphabetical/numerical or reverse alphabetical/numerical order respectively.
Text as numbers: This achieves the appropriate sort for alphanumeric identifiers, for example it would produce the order A1, A2, A10, A20 rather than A1, A10, A2, A20.
Last word only: Only the last word in each field is used as the sort key. Enabling this option over-rides the following Ignore options.
Ignore blanks: If you select this box, Calm ignores spaces, tabs and line breaks when comparing fields. For example, A Time of Changes would be sorted after Abyss.
Ignore punctuation: If you select this box, Calm ignores punctuation characters when comparing fields. For example, ...And All the Stars a Stage would be sorted after Abyss. Punctuation characters are any characters except letters, numbers and blanks.
Ignore first word(s): If you select this box, Calm ignores the first word when comparing fields if the
word is one of those listed in the box below the option. For example, if the
ignored words are “a”, “an” and “the”, then The Clipper of the Clouds would be
sorted before Journey to the Centre of the Earth.
Click OK to perform the sort. The sort order will not be retained if the hit list is changed, for example if you perform another search. Terms that contain accented characters (such as á) are sorted as if the characters were unaccented.
Deleting the hit list (Administrators Only)
PLEASE NOTE: THIS FUNCTION HAS BEEN REMOVED FROM GENERAL USE FOR SAFETY REASONS.
It is important to use this powerful feature carefully. Deleting a hit list will delete records from your database, not just remove them from the current hit list.
This option is available to Administrators only. Administrators are defined in the security options in Admin.
To delete a hit list of records, first perform a search for the records you wish to delete, using conventional Calm search techniques. Check that none of the records you wish to delete have links to other records as this will stop the process.
With the appropriate hit list on screen; press the
 button in
the side button strip, followed by the
button in
the side button strip, followed by the
 button.
Please note that if this option does not appear in the side button strip you do
not have sufficient permissions to delete the hit list.
button.
Please note that if this option does not appear in the side button strip you do
not have sufficient permissions to delete the hit list.
During the delete process, if a record is found that is linked to another, it will not be
deleted, the process will be stopped and the rest of the records will not be
deleted. To continue you will need to remove the link or drop this record from
the hit list, then click the
button
again.
Stacking and Recalling Hit lists
You can store hit lists temporarily by stacking them. You should stack the hit list when you know you will want to return to the current hit list, or if you are not certain that the next search will have the desired effect. You can stack several hit lists and then backtrack through them in reverse order. The first backtrack command restores the most recently stacked hit list, and so on. As you backtrack through the hit lists, they are removed from the stack – if you want to use a hit list several times, you need to stack it each time you anticipate needing to backtrack to it.
Please note that the current hit list is stacked automatically when you use Search, Cross Reference
To stack a current hit list:
Click the Hit List drop down menu,
click Stack, the current hit list is now stacked. You can also use the
![]() button in the tool bar to stack the current hit list.
button in the tool bar to stack the current hit list.
You can now continue searching as normal. When you want to
return to the stacked hit list, click Hit List, Backtrack or click the
![]() button.
If you have stacked more than one hit list, you can backtrack more than once to
step through the stacked hit lists in reverse order.
button.
If you have stacked more than one hit list, you can backtrack more than once to
step through the stacked hit lists in reverse order.
To backtrack to the first stacked hit list, press down and hold the shift key while you click Hit List, Backtrack. All stacked hit lists will be removed from the stack.
Marking and dropping records
You can remove a small number of records from the hit list (without deleting them) by moving to each unwanted record in turn and clicking the Record drop down menu then clicking Drop. The record will be removed from the hit list.
If you want to drop all but a few of the records in the hit list:
- Move to one of the records you want to keep (by clicking the
Next Record
 or
Previous Record
or
Previous Record
 buttons in the tool bar, or using
View, Overview from the drop down menu).
buttons in the tool bar, or using
View, Overview from the drop down menu). - On the Record drop down menu, click Mark. The word Marked appears in the status bar.
- Repeat the steps above until all the required records have been marked.
- On the Record drop down menu, click Drop Unmarked, the unmarked records will be removed from the hit list.
Please note that you can unmark a marked record by clicking the Record drop down menu and clicking Mark again.
If you wish to drop a small number of records from a hit list you can mark them in the manner described above but choose the Drop Marked option from the Record drop down menu to remove the marked records from the hit list.
Marking Records in the Overview
To open the Overview click the View drop down menu and click
Overview or click on the Overview button
![]() on the tool bar.
on the tool bar.
Records can be marked in the Overview by highlighting the
appropriate records in the Overview and clicking on the
![]() button in the
top left corner of the overview, next to the column headings. Click it again to
unmark the record.
button in the
top left corner of the overview, next to the column headings. Click it again to
unmark the record.
Please note that you may highlight multiple records in the Overview by holding down the CONTROL key on your keyboard and highlighting several records by clicking on them in the Overview. To block highlight records in the Overview hold down the SHIFT key on your keyboard and click on the record at the start of the block and the end of the block in the Overview. All the records in the block will be highlighted.
You can mark multiple records by highlighting more than one
record at once and clicking the
![]() button to mark them.
button to mark them.
When a record in the Overview is marked you will see an X symbol appear to the left of the record in the overview.
Printing the Overview
Once you have sorted and edited the hit list, you can create an HTML document from it, to save or print. Please note: the overview window must be open before it can be printed.
-
Click on the File drop down menu, click
Print, click Overview, click To HTML (NB: to print a list without seeing a
preview you could click To Printer at this stage).
- A dialogue box called Overview to HTML will open, as shown:

- Click on the Hit list radio button and click OK.
Calm uses your default browser to create an HTML page from the hit list. This will show the overview as seen on your Calm screen, using the column headings and record order from the hit list overview; it can now be saved, emailed or printed as required.